Long Exposure Photography explained

My Ultimate Guide to Long Exposure Photography
Long exposure photography can create stunning and unique images that capture movement and light in a way that is impossible to see with the naked eye. It can help us to capture not only the energy of the scene but also give your photographs more life and movement, this adds another more creative layer to your composition that can really help to not only create surreal works of art but also completely immerse your viewer in the scene.
The real beauty is, this is all done in camera in a single photograph, it’s not trickery or editing this is all completely real and under your control.
This in-depth Long Exposure Photography guide will not only explain how you can take stunning long exposure photographs but also help you to open your mind to the possibilities this technique can create for you and your photography.
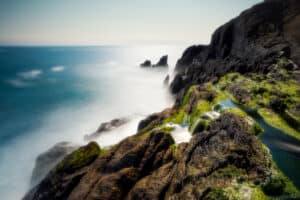
Take the above long exposure photograph as an example this shot was taken at the beach and the use of a slower shutter speed helps to highlight the dragging of the wave as it retreats back out to sea again, this flow and movement gives the photograph a bit more life, drama and interest and adds another unique layer helping to create more mood and intensity in your work.
Long Exposures are real photographs and an art form in their very own way and in this step-by-step guide to long Exposure Photography we’ll cover everything you need to know to get you started, including the right equipment, camera settings, mindset (most important part) and of course, the exact techniques you need to know to help you create stunning Long Exposure photographs.

Understanding Long Exposure Photography.
Think of Long Exposure photography as a playful use of contrasts, we have sharp and smooth elements intertwining in a single image to create a visually pleasing effect and this is something you created rather than just captured. As we all see compositions differently we all then see how the water or movement will look differently too so this adds yet another tool we can use to add our own twist and unique style to a photograph.
Generally Long Exposure photographs are considered to be half a second and longer. Of course that is open to debate, for me a long exposure photograph is one that primarily helps to creatively amplify any movement in a photograph.
The length of time your shutter is open (shutter speed) is what determines how blurred the moving parts of your image will be. This is one of the most important steps in capturing a long Exposure photograph and something you really need to think a lot about as you are setting up your shot. It does take a bit of experimenting to get right, but I have a tip for you further down to help you out there.
The motion blur created can help us create stunning images of waterfalls, star trails, light trails, waves even people, as you can see the only limitation here is your own imagination. The key to it all really is a bit of thought and being in the right mindset (there’s that word again) before we even consider taking the shot. There are a few very important elements in Long Exposure photography so let’s look at them now.
The most important element in Long Exposure Photography
The key to successful long exposure photography is understanding that we need to have a perfectly steady camera. If your camera moves during a long Exposure (even slightly) then the whole image will come out blurred and ruin your shot.
I can’t stress enough how important it is to have a good quality steady tripod for Long Exposure photography, a tripod is your best friend here. It’s also very important that your tripod is sitting on solid ground and it can’t rock or move in anyway for the duration of your shot. That’s the real key to getting those pin sharp photographs.
With tripods I always say buy a really good one then you only cry once 🙂
Tip… If you find the centre of your photographs are sharp and the sides and corners aren’t then there is a good chance that’s down to your camera wiggling or moving slightly, this will blur the edges of the image a lot more then the centre of the photograph. It’s usually caused by someone pressing the shutter button as that causes the camera to twist on the tripod very slightly (cure for that below).

Essential Equipment for Long Exposure Photography.
To get started with long exposure photography, you’ll need a few essential pieces of equipment.
- Tripod… As I just mentioned above you will need a sturdy tripod as this will keep your camera steady during the long exposure. If your tripod is not steady then you could get camera shake and the whole image will be blurred then. A good tripod is going to be a great investment for you and your photography.
- ND Filters… Filters or Neutral Density filters (ND Filters) are a very important part of Long Exposure photography as they help to darken down or block the light hitting your camera’s sensor so the camera needs to take the photograph for longer in order to be able to soak in enough light to make the photograph hence our Long Exposure Photograph. Without Neutral Density filters a lot of my work simply wouldn’t be possible. Think of ND filters as sunglasses for your camera.
- Remote Shutter Release… A remote shutter release or alternatively using an app on your phone to control your camera is very important, otherwise when you press the shutter button on the camera you can create camera shake and this causes blurring or movement which can ruin your shot. A lot of newer cameras have an app you can control them with, so you can also use this as it avoids you having to physically touch the camera. Remote shutter releases can be corded or wireless. I prefer to use a wired remote over the other options for two reasons, Firstly, unlike using an app it doesn’t use your cameras battery for wifi or Bluetooth and the wireless shutter releases also run down their batteries fairly quickly and the last thing you want is a flat batteries on a shoot. Secondly, the wired version gives you a physical connection to your camera in case your tripod gets blown over or hit by a large wave or worse yet one of the legs fails. You have a slightly better chance of saving your camera then it, they are also cheaper 🙂
- A camera with Manual Mode…. Manual mode is very important as it gives you complete control over your photograph so you can control the length of the shutter speed so you get exactly the right effect in your photograph.

Choosing the Right Settings for Long Exposure Photography.
When it comes to long exposure photography, choosing the right settings is crucial.
- The first step is to set your camera to manual mode so you have full control over the exposure settings.
- Next, set your ISO to its base ISO, sound complicated? Well it’s not, it’s also important to note here that this may not be the lowest ISO setting on your camera, a quick Google of the Base ISO for your camera model will reveal the correct ISO to be using. Using your base ISO will help to reduce noise and also give you more dynamic range to play with when you are editing the photo. See, it’s really simple in the end.
- Choose a small aperture something like F11 (high f-stop number), this will do two things for you here, firstly, it will increase the depth of field or how much of your scene will be in focus and secondly, it will reduce the light level going through the lens and hitting your sensor. I would normally suggest using an F-stop of F8 to F16 here. I have more details on selecting the right aperture for your camera further down this article.
- Finally, adjust your shutter speed based on the effect you want to achieve (this is where you need ND filters more on that below). This brings us to how what shutter speed would I suggest, for silky smooth long exposures of the Sea then aim for approx a 30 second exposure, for shorter long exposure of the waves like the shot below, aim for a 1 to 2 second exposure for that effect. For waterfalls and rivers, you can go from half a second to 5 seconds again depending on the effect you want. Half a second is great for slight motion blur while still retaining water detail. Star trails are anything from 10 seconds to a few minutes long. Extreme long exposures of buildings and clouds whipping past again are best at around 30 seconds to 2 minutes but it depends on cloud speed.

What aperture should you use?
As I mentioned above using a small Aperture or higher F stop number will give you a greater depth of field and also reduce the light going through your lens. If you would like to know more about how to shoot in Manual and how aperture works then check out my video below.
Please note these settings do not apply to Astro Photography.
To select the right aperture you need to know what type of camera sensor you have and don’t worry this is easy to do simply Google your camera models sensor size and it will more than likely be one of the following three sizes… Full Frame, APSC or Micro Four Thirds.
This is important because different sensor sizes behave differently at different apertures. So it’s a good idea to start off on the right foot and not teach yourself bad habits. I have the three apertures for the different sensor sizes below.
Full frame camera I would use F11 as it will give you sharp images and also still give you a good depth of field in your shot. Normally I would say try to stay between F8 to F16 here.
APSC Camera (cropped sensor) I would use F8 as again it will give you a good depth of field and you will maintain good sharpness levels. I would say F8 to a maximum of F11 here.
Micro Four Thirds camera I would use F5.6- F8 for maximum sharpness and a good depth of field again.
Now please note these are my default settings and every photograph will have a different depth of field in it, that depends on your focal length and the proximity of the foreground and how much of the scene you want in focus of course.
So this brings us now to ND filters and how do you pick the right one?
ND filters and how do you pick them and use them?
Ok, as I mentioned above Neutral Density filters are basically sunglasses for your camera and they reduce the amount of light hitting your camera’s sensor, knowing which one you should use in each individual situation is not that simple to answer as light levels vary throughout the day and we are all using different cameras too.
The simple way to select an ND filter is to take a photograph of the scene you want to capture and properly expose the photograph without an ND filter fitted, let’s say the shutter speed was 1/125th of a second in this instance. Then download and open the app “ND expert” on your phone and it will ask you to input the shutter speed, simply click on the shutter speed box and scroll up and down and input your shutter speed in this example it’s 1/125th of a second.
Next we select the strength of ND filter in the second drop down box and for this example let’s pick a six stop ND filter. Once I select this you will see the correct shutter speed of 0.5″ or half a second exposure appear.
This means if we take the same shot with the six stop ND filter and our shutter speed is half a second it will come out perfectly exposed.
For a second example let’s try a 10 stop ND filter so our shutter speed is still 1/125th of a second and this time we select the 10 stop ND filter from the ND filter drop down list. This gives us a time of roughly 8 seconds for our exposure now.
When you look at the 1/125th, 0.5″ and 8″ shots side by side the exposure should be nearly identical but the differences you will see will be the movement in the scene then.
If you don’t have ND filters then go out and take photographs at dusk when the light level has dropped and you should easily be able to get half a second and longer photographs without an ND filter.
If you are looking to buy ND filters I always say go cheap and cheerful and try them out first the ones on Amazon below are a great starting off kit (not that strong but great value for money) or if you really want to take some proper Long Exposures then the Formatt Hitech Firecrest filters are amazing and I have a 10% Formatt Hitech discount code here for them to help save you a bit of money.

")
Mindset for capturing Long Exposure Photography.
For me being in the right mindset is truly the key to capturing exactly what you want in a long exposure as you need to be relaxed calm and present in the moment to see what’s there. If you are tense, rushing or distracted then that will block your vision for the shot.
My first tip is to arrive with plenty of time to spare so you can sit down and watch the scene unfold for a bit and notice patterns and movement, then really think about how you can add this extra dimension into your photograph.
Again being there early helps you plan out what you want and helps take the pressure off which helps you relax a bit more.
Clearing your mind and really focusing on what you see before you will help you connect with a shot then too. Once you can see what you want it’s only a matter of translating that into the camera then. This gets rid of the hit and hope technique and you become more focused on what you want to get.
Let’s say you are shooting a seascape, you need to watch the waves for a while, look at the angles on the beach and watchout for any patterns emerging, then think about they can help your composition and if changing camera height or you position slightly will help melt it all together.
When you are relaxed and you have time you see a lot more, you go back to thinking more like a child then as let’s face it they notice all these things long before we do as they are more open to it and have less stress in their lives generally.
The other thing this will do for your photography is it will add more of you into the image and your style of work so you as a result will like it more then and enjoy the time taking photographs a lot more then too.
Once you capture a nice photograph whatever else you do make sure to print it off so you can see it, I guarantee you it will put a smile on your face for a long time to come then.
Thanks again for reading this and I hope it helped you, if you have any questions then please do feel free to ask them.
If you would like to know more about photography then why not check out my photography Workshops In Ireland here.
I am lucky enough to work with a few different companies to help promote their and as a result, they have given me a discount code for their products so be sure to check out my…
Skylum software Discount code here.
See you out there,
Kieran.

Mastering Long Exposure Photography : 5 Simple Tips.
Dive into the art of long exposure photography and learn techniques to capture stunning light trails and dreamy landscapes. Explore Kieran Hayes Photography's expert tips and tricks.
5