Nikon Z8 Autofocus Settings — My Complete 2026 Setup
By a professional photographer with 20+ years of hands-on camera experience · Updated November 2026
My Nikon Z8 Autofocus Settings — One System for Everything
Welcome to my complete Nikon Z8 autofocus settings guide for 2026. This is the exact focus setup I use every day, now updated with a few new additions like the focus limiter, recall shooting functions and a handful of smaller settings that, combined, really do make this system excellent.
I’ve shot everything with this setup — products, fashion, portraits, events, landscapes, sport and wildlife — and that’s the whole point of it. One system does it all, so you build the same muscle memory no matter what you’re shooting. Stop thinking about autofocus modes and start concentrating on the photograph.
Every setting below comes with the exact menu path, so you can follow along with your camera in hand. Most of it applies to the Z9 as well, as the two cameras share the same autofocus system.
My Nikon Z8 Autofocus Settings — Quick Reference
| Setting | My choice |
|---|---|
| AF mode | AF-C (continuous) |
| AF-C in-focus display | On — green focus box (a11) |
| Store points by orientation | Focus point and AF area mode (a5) |
| AF activation | AF-ON only — back button focus (a6) |
| Save focus position | On (Setup menu) |
| Focus point wrap-around | On (a10) |
| Fn1 | 3D-tracking — for focus handoff |
| Fn2 | Cycle AF area mode: Single point, Wide-area L, Auto-area |
| Movie record button | Switch eyes |
| Fn3 | Shooting menu banks |
| Sub-selector centre | Focus limiter |
| Exposure comp button | Recall shooting functions |
| OK button | Reset focus point to centre |
| Lens control ring | Off |
| Subject detection | Auto (Bird for birds, People for portraits) |
| Focus tracking with lock-on | Longer delay for sport and wildlife (a3) |
| Focus peaking | On, red (a13) |
📄 Want this as a printable PDF?
Get my free Z8 autofocus cheat sheets: the full one-page sheet, this quick reference and pocket-sized cards for your camera bag.
Want every setting on your Z8 — not just autofocus — in your pocket? My Nikon Z8 Pro Guide app has my full setup, the complete menu structure and a troubleshooting section, all searchable and offline. Shooting a Z9? There’s a Z9 version too.
This review is part of my complete Nikon Z camera review guide — where you’ll find every camera body review, lens review, head-to-head comparison and accessories guide in one place. So turbo boost your photography today and check it out.
Table of Contents
Watch my full Nikon Z8 autofocus settings video.
AF-C: Continuous Autofocus
I always shoot in AF-C, continuous autofocus. AF-S focuses once and locks, but AF-C keeps focusing for as long as you hold the focus button. So if your subject moves towards you or away from you, the camera keeps it sharp.
To change it, hold down the focus mode button and rotate the rear command dial until you reach AF-C. One honest note: AF-S is still slightly better in very low light, so it’s worth knowing it’s there.
AF-C In-Focus Display — That Lovely Green Box
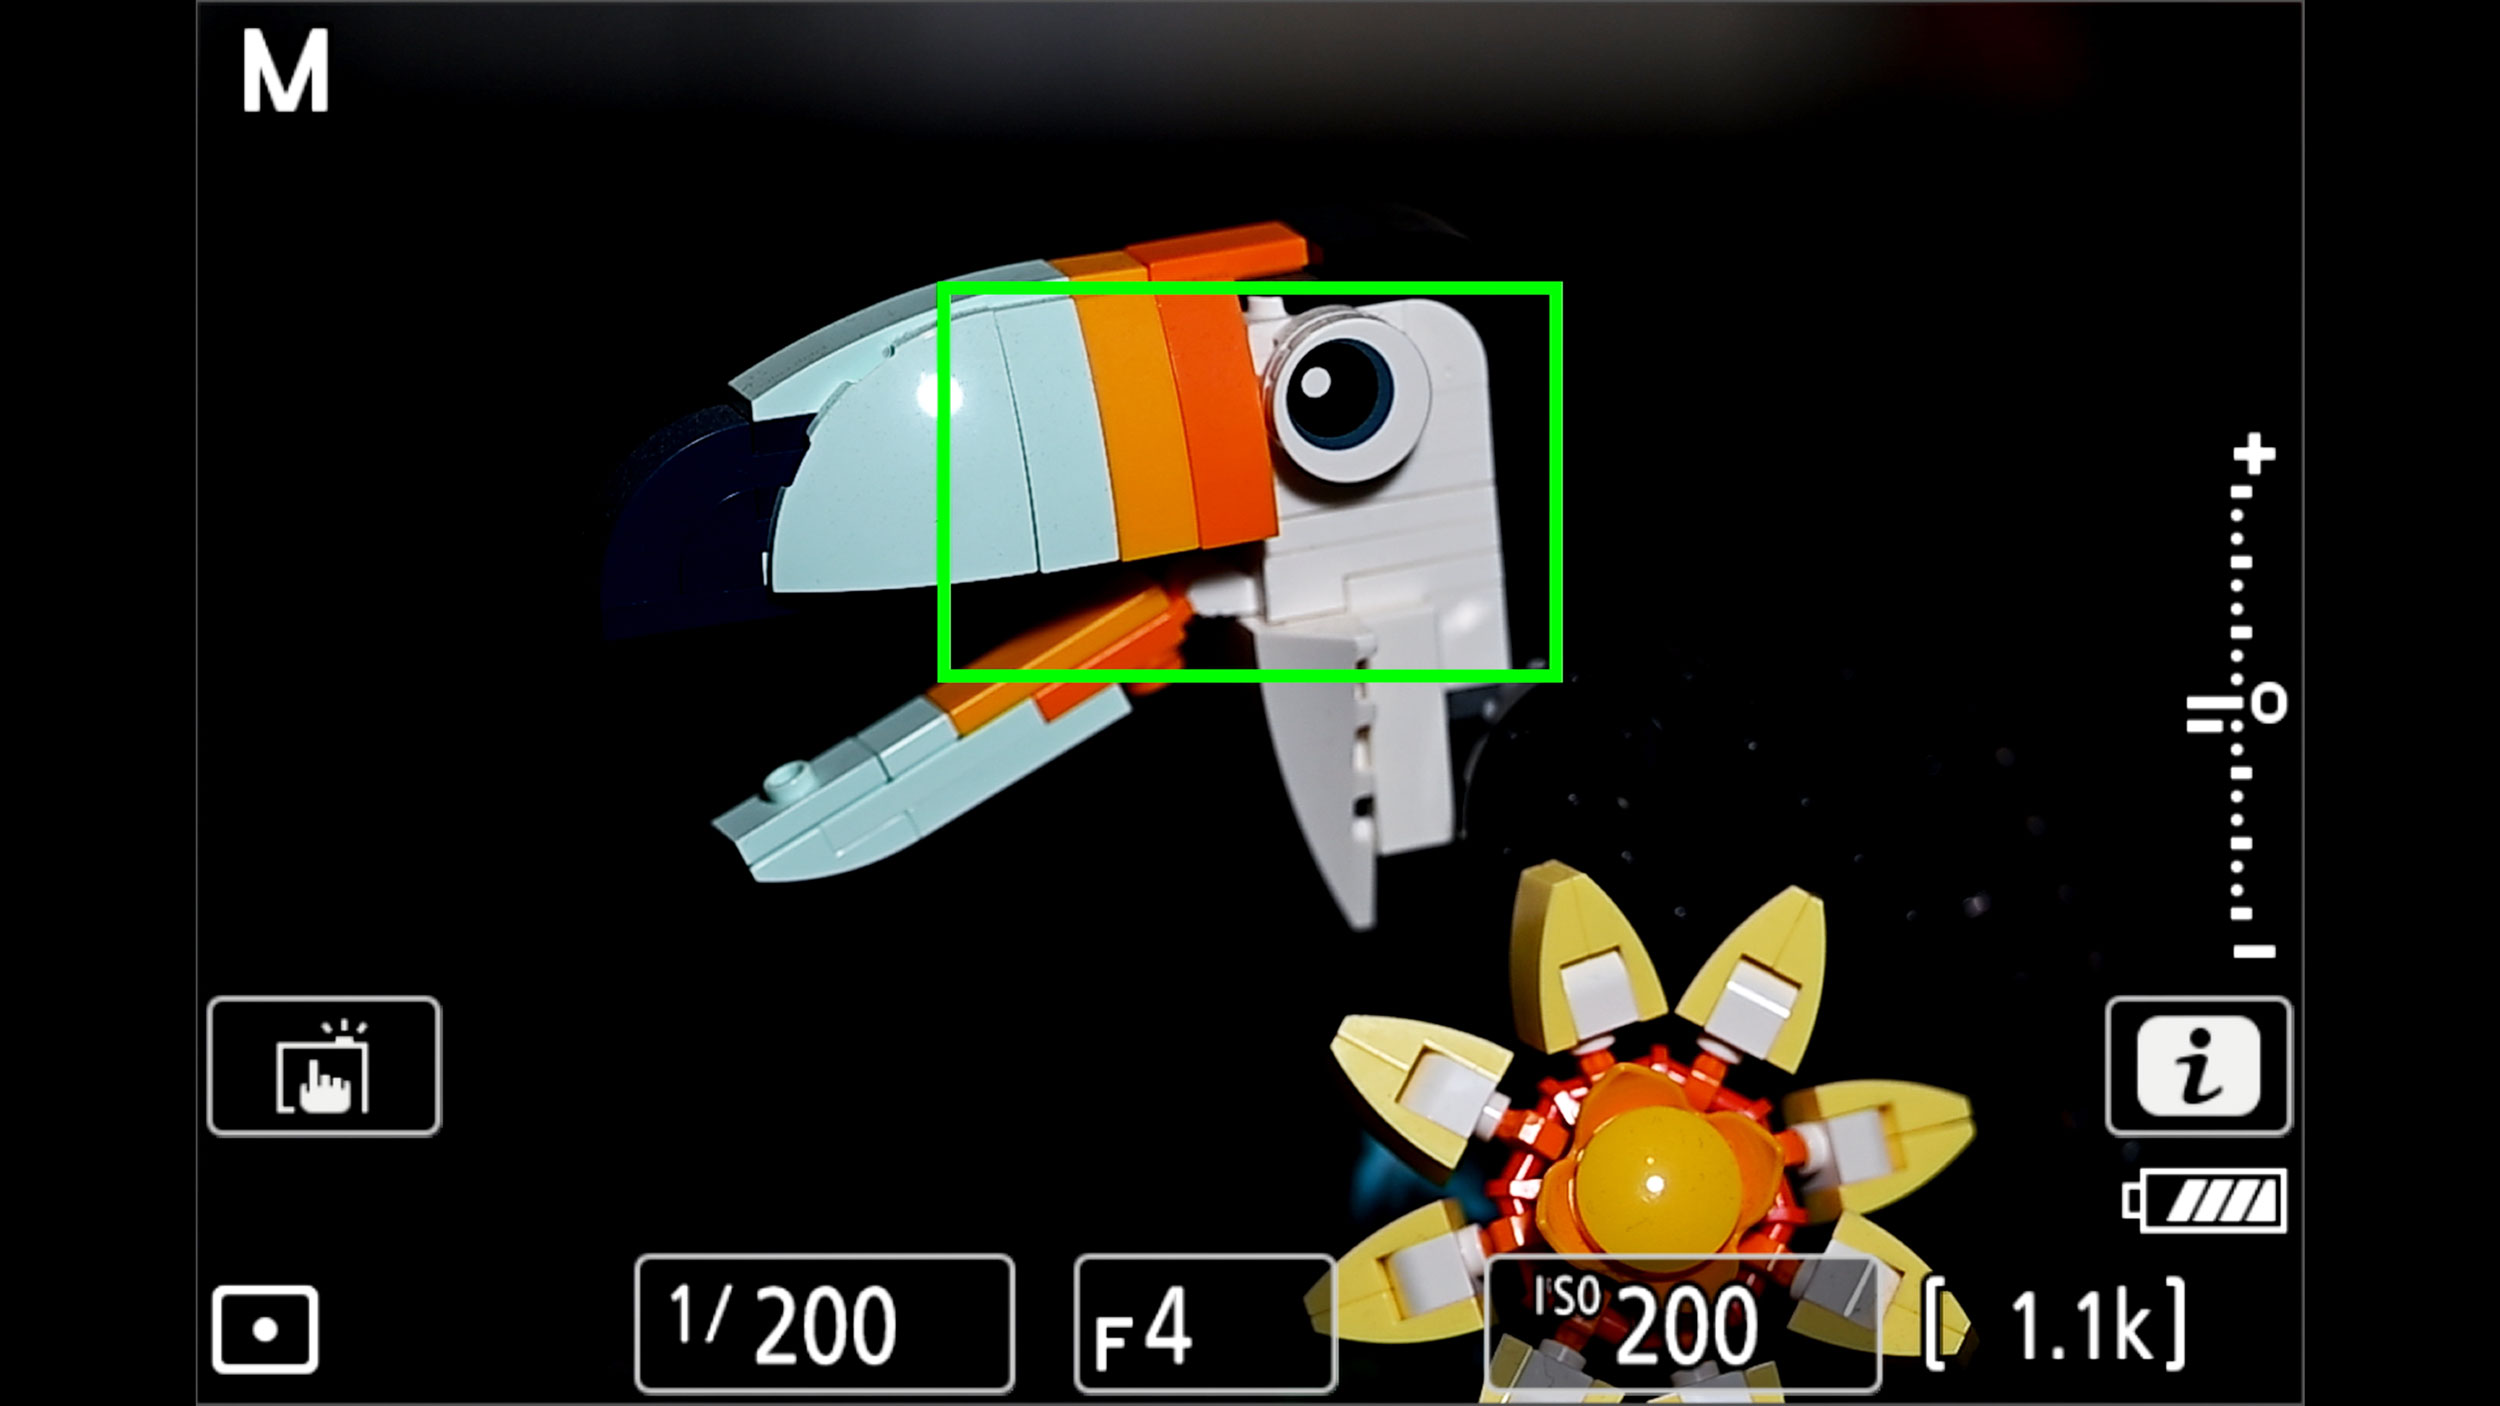
This is without doubt my favourite setting to change on the Z8. By default in AF-C, your focus box stays red even when focus is locked, so you never get that reassuring confirmation that you’re sharp.
Switch this on and the box turns green the moment focus locks. It’s a small change, but it gives you real peace of mind when the pressure is on.
Menu path: Menu → Custom Settings (pencil icon) → a Focus → a11 Focus Point Display → AF-C In-Focus Display → OK
Store Points by Orientation
This is one of those settings you never knew you needed until you try it. Normally your focus point stays in the same spot whether you’re shooting landscape or portrait orientation. With this enabled, the camera remembers a separate focus point and a separate AF area mode for each orientation.
So I can have my focus point over my subject’s eye in landscape, flip the camera to portrait and it instantly jumps to where I need it — no fumbling to move the point every time you turn the camera. For fast-paced weddings and events, that’s the difference between getting the split-second shot and missing it.
Menu path: Menu → pencil icon → a Focus → a5 Store Points by Orientation → Focus Point and AF Area Mode → OK
Back Button Focus
Back button focus separates focusing from the shutter button entirely. Your thumb focuses with the AF-ON button and your index finger stays free on the shutter, ready for exactly the right moment.
I’ll be honest — the first time I tried it, I hated it for the first few hours. Now it’s the very first thing I enable on every new camera. Combined with AF-C, it completely changed my keeper rate.
Menu path: Menu → pencil icon → a Focus → a6 AF Activation → AF-ON Only → OK
Save Focus Position
By default, the Z8 resets your focus to infinity every time you switch it off. So you turn the camera off to save battery, switch it back on and your focus is gone. This drove me mad on my first day with the Z8 until I found this setting.
Switch it on and the camera remembers exactly where you last focused.
Menu path: Menu → Setup Menu (wrench icon) → Save Focus Position → On
Focus Point Wrap-Around
Normally when you move your focus point to the edge of the frame, it stops dead. With wrap-around enabled, it carries on — off the left edge and straight back in on the right and the same going up and down. It’s noticeably faster than dragging the point all the way across the frame.
Menu path: Menu → pencil icon → a Focus → a10 Focus Point Wrap-Around → On

Custom Buttons — Where the System Comes Together
This is where everything clicks. I’ll explain exactly why these buttons are set this way in the focus handoff section below, but here’s the setup.
Fn1: 3D-Tracking
Fn1 is set to 3D-tracking. This is the key to the focus handoff technique.
Menu path: Menu → pencil icon → f Controls → f2 Custom Controls (Shooting) → Fn1 → AF Area Mode → 3D-Tracking
Fn2: Cycle AF Area Mode
Fn2 is set to Cycle AF Area Mode. This lets you rotate through a short list of AF area modes with one button — no menus and no scrolling through every mode, just the ones you actually use.
Less really is more here. I keep just three: Single-point for precision work like products and landscapes, Wide-area L as my everyday default and Auto-area AF. Every mode you add is another button press between you and the one you want. With three, I’m never more than two presses away. And the dedicated AF mode button on the side of the camera is still there if you ever need one of the others.
Menu path: Menu → pencil icon → f Controls → f2 Custom Controls (Shooting) → Fn2 → Cycle AF Area Mode → press right to choose your modes → Menu button to finish
Custom Wide-Area C1 and C2
Wide-area L is my go-to AF area mode. It’s big enough to put over your subject and small enough not to confuse the camera with other subjects. But if that box has never felt quite right for your style of shooting, the Z8 gives you two custom wide-area modes, C1 and C2, where you can set the box to exactly the size you want.
You can then add C1 or C2 into your Fn2 cycle in place of one of the standard modes. It’s your system — make the box work for you.
Menu path: Menu → Photo Shooting Menu → AF-Area Mode → Wide-Area AF (C1) → press right → set the width and height with the arrow keys
Movie Record Button: Switch Eyes
Here’s a bonus. I set the movie record button to switch eyes. The Z8 generally picks the nearest or most prominent eye, but with this set, one press of the record button swaps to the other eye — or cycles between people if you’ve got a group inside your AF area. Don’t worry, it doesn’t affect the button in video mode; it still starts and stops recording there.
Menu path: Menu → pencil icon → f2 Custom Controls (Shooting) → Movie Record Button → Switch Eyes
Fn3: Shooting Menu Banks
Fn3 is assigned to my shooting menu banks, so I can switch between complete shooting setups in a split second.
Focus Limiter on the Joystick
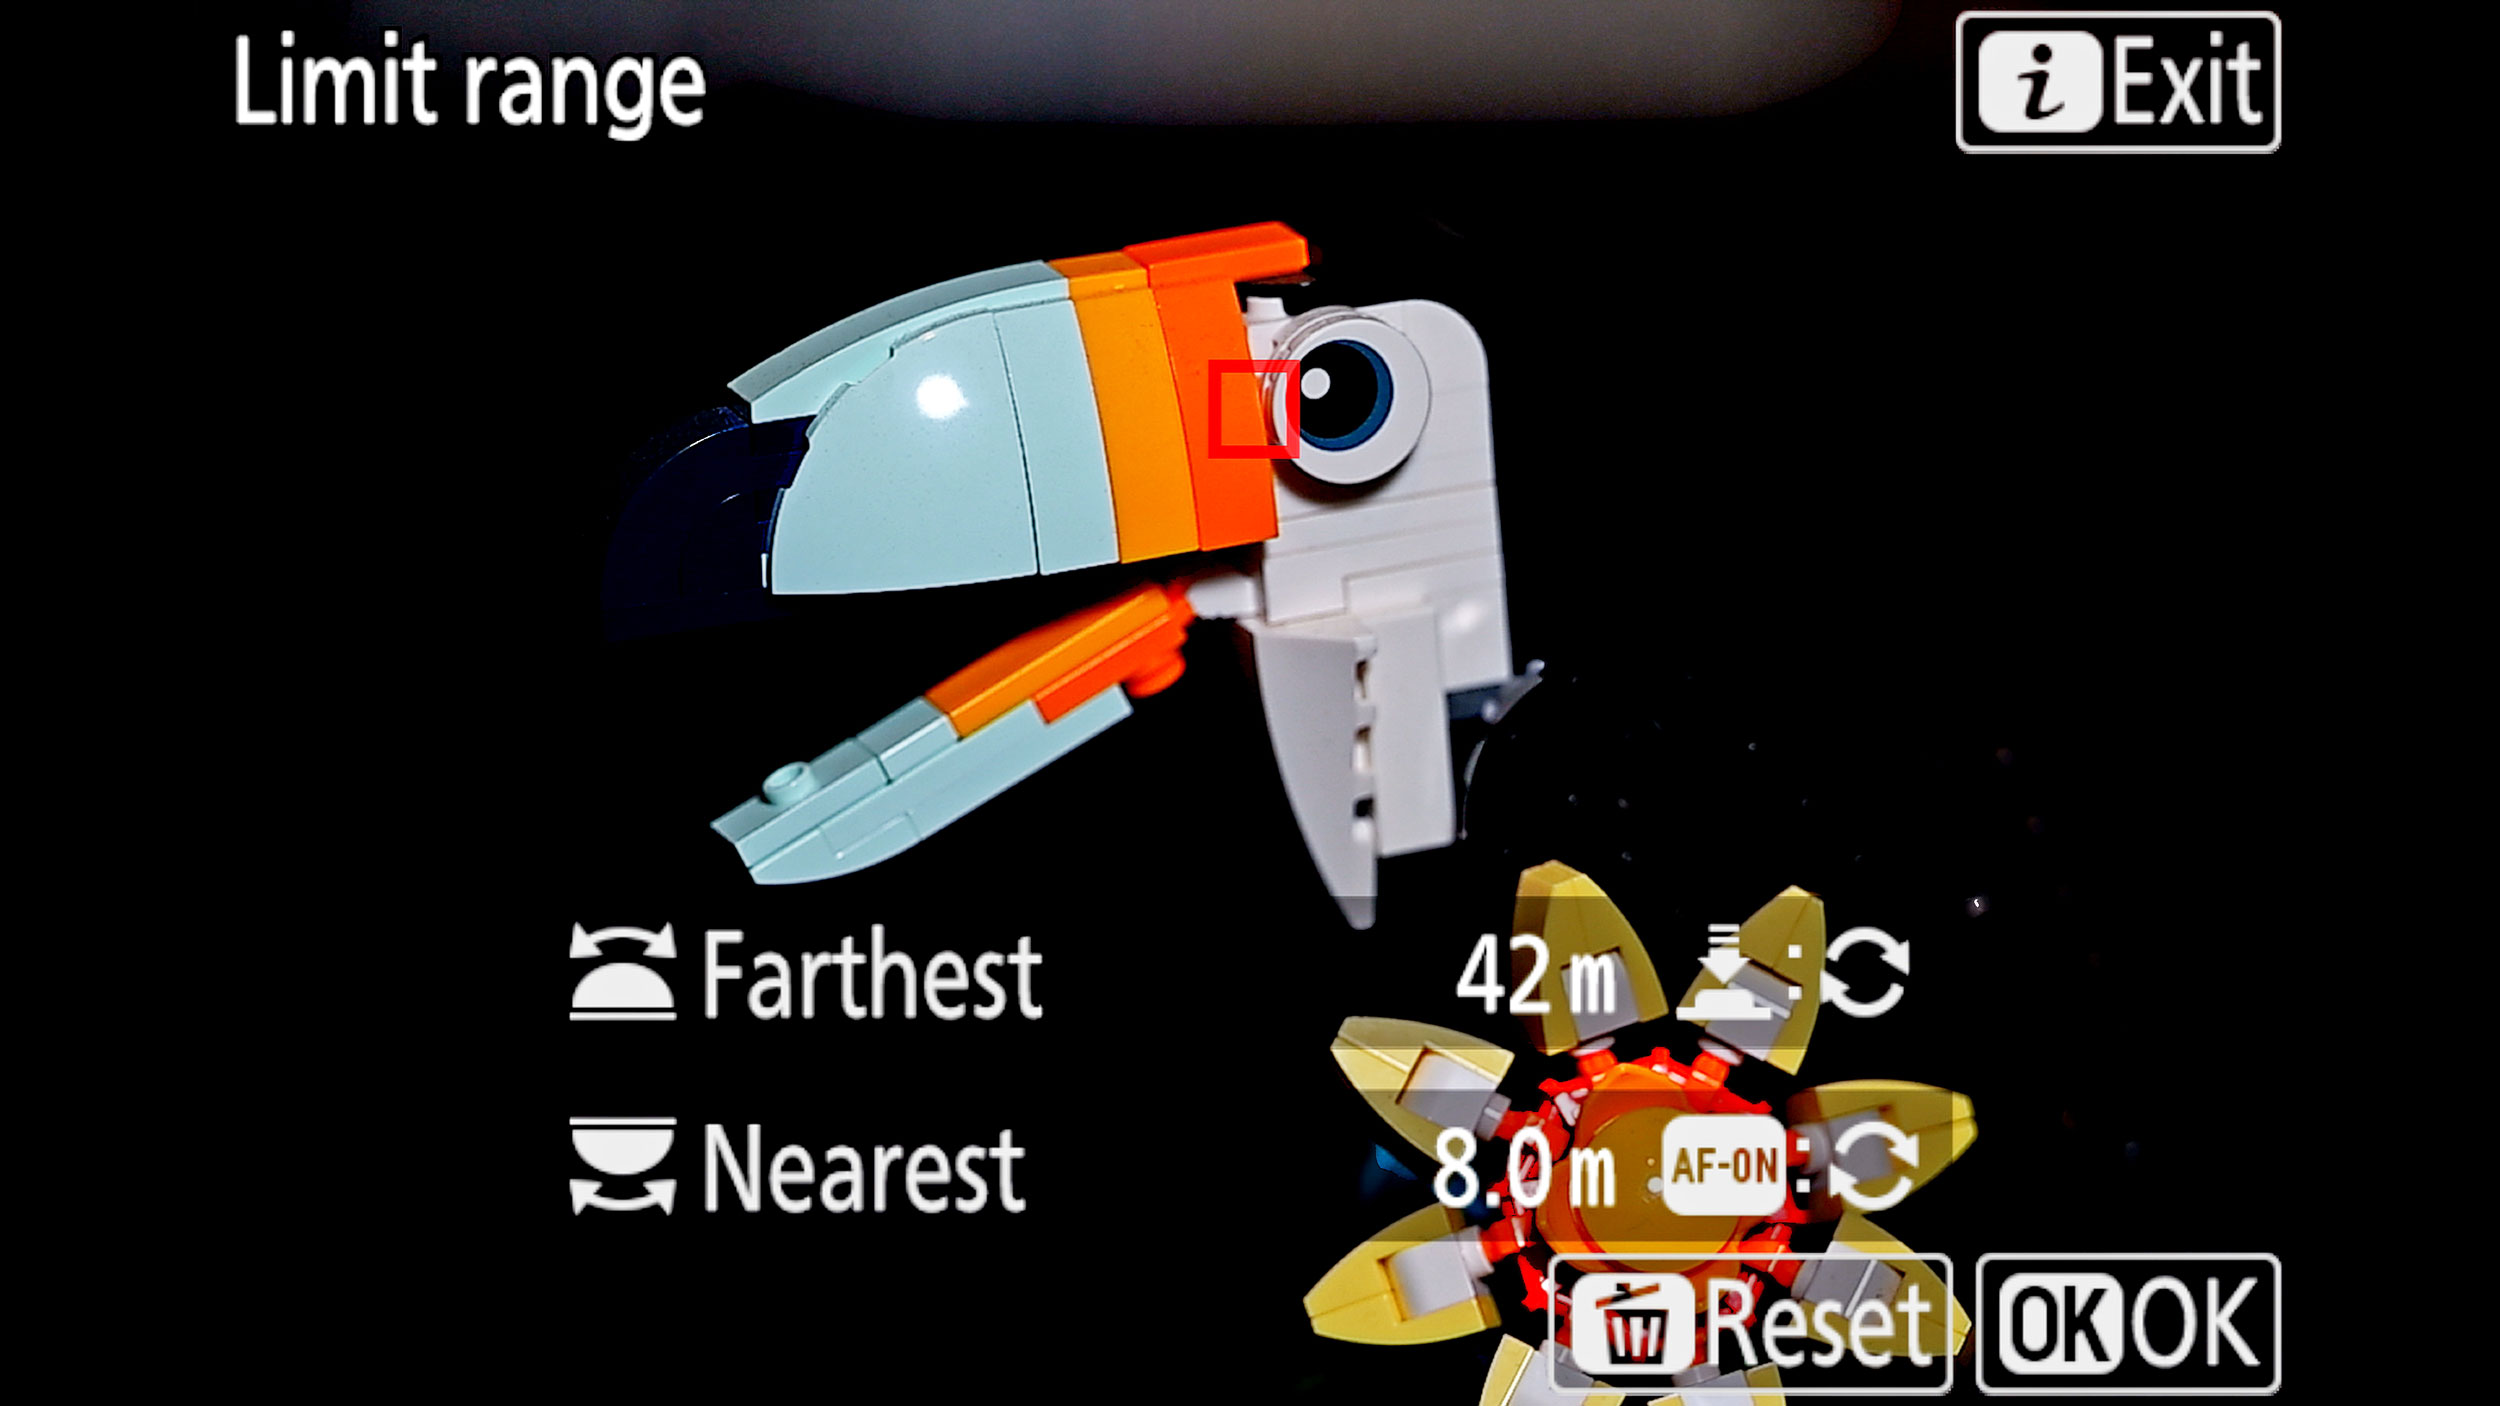
I’ve set the centre press of the joystick (the sub-selector) to the focus limiter. This lets you set a minimum and maximum focusing distance and it’s brilliant in a few situations. If you’re shooting a game through Perspex, the camera can hunt between a scratch on the Perspex and the player behind it. Set a minimum distance beyond that scratch and the problem disappears. It works just as well for wildlife when long grass, reeds or branches sit between you and your subject.
Hold the joystick centre for a second and a menu pops up. The front command dial sets your far limit, the rear dial sets your near limit and OK confirms. After that, a quick press toggles the limits on and off.
Menu path: Menu → pencil icon → f Controls → f2 Custom Controls (Shooting) → Sub-selector centre → AF/Focus Limiter → OK
Recall Shooting Functions
Recall shooting functions lets you toggle between two completely different camera setups with one button press.
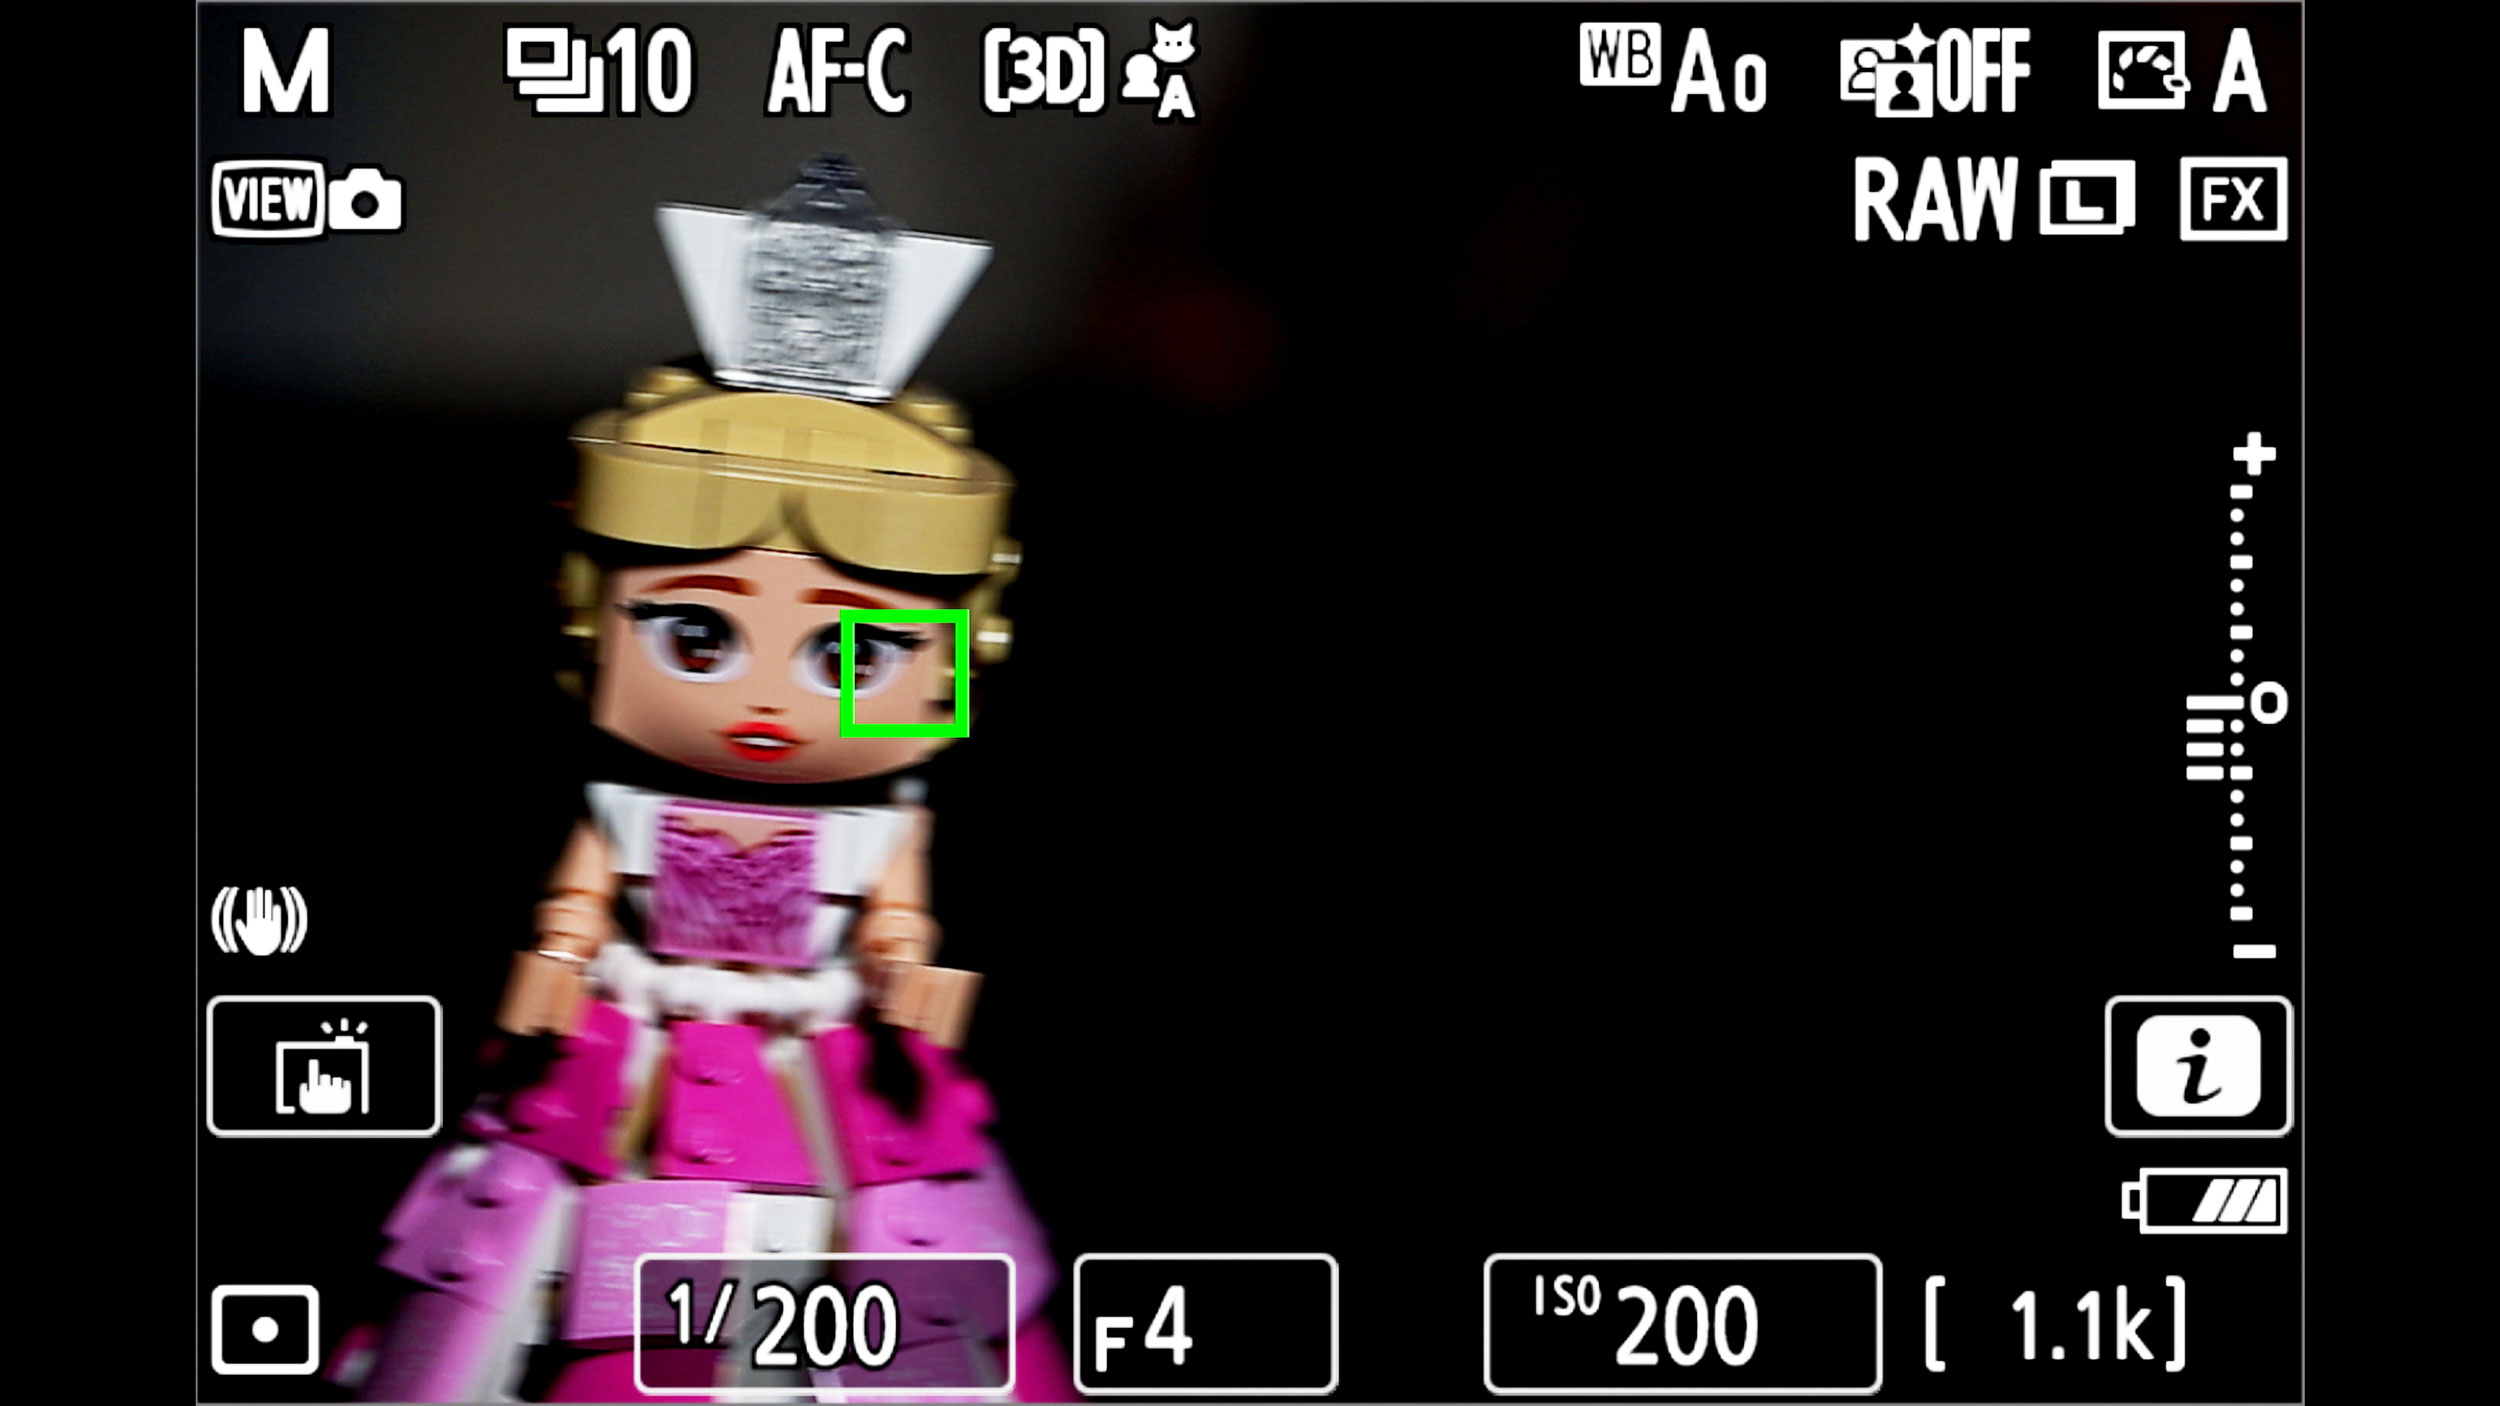
Picture a bird perched on a branch. You’re at a slower shutter speed, manual ISO and single shot. Then it suddenly takes off. Normally you’d be fumbling with settings while the moment disappears. With recall shooting, one press and you’re instantly at a faster shutter speed, Auto ISO and high-speed burst. Press it again and you’re back to your perched settings. The camera remembers both setups and any changes you make in either are saved automatically.
I assign it to the exposure compensation button, because it sits right beside the shutter and I don’t use that function — but you can put it on any button that suits you. When it’s active, you’ll see a camera icon with an arrow on the left of the rear screen, or top-left in the viewfinder. Set up your second configuration while you’re in it and from then on that button simply toggles between the two.
Menu path: Menu → pencil icon → f Controls → f2 Custom Controls (Shooting) → Exposure Compensation button → Recall Shooting Functions → OK
Two Quick Extras
OK button resets the focus point. I set the OK button to send the focus point back to the centre of the frame. One press and you’re home, no messing about.
Lens control ring off. By default the control ring sets your aperture and for me it’s far too easy to bump while handling the camera. Switching it off entirely has saved me more shots than I’d like to admit.
Subject Detection — Picking the Right Mode
The Z8 gives you more subject detection options than most people realise and picking the right one genuinely matters. You’ll find it under Menu → Photo Shooting Menu → AF/MF Subject Detection Options.
You’ve got Auto, People, Animal, Bird, Vehicles and Airplanes. Auto is surprisingly good — the Z8 is remarkably clever at working out what you’re pointing it at, so if you’re switching between subjects quickly, just leave it there.
For portraits, People mode with eye detection nails focus more consistently than Auto, locking on to the nearest eye and holding it.
And here’s the one most people get wrong: if you’re photographing birds, use Bird mode, not Animal. It’s tuned specifically for the speed and erratic movement of birds in flight and in my experience it outperforms Animal mode. It finds the eye when the bird is fairly close and tracks the body when it’s further away.
Subject detection pairs beautifully with Wide-area L and that’s no accident. The box is big enough for the camera to detect your subject, but small enough that it isn’t distracted by everything else in the frame.
Boosted Subject Detection: The Focus Handoff Technique
If you’ve applied everything so far, you already have all the pieces in place for this. Now it’s about using them together.
Here’s how I shoot most of the time: AF-C, Wide-area L, subject detection on Auto (or the right mode if you shoot one genre). I put the box over my subject, press AF-ON and get the green box. Focus confirmed.
But what happens when your subject — let’s say a child running around — moves too fast for you to keep dragging the AF point after them? That’s where focus handoff comes in. It sounds complicated, but it really isn’t.
Focus on your subject as normal in Wide-area L. The moment you have focus lock, press and hold Fn1 together with AF-ON. Remember, Fn1 is set to 3D-tracking. You’re telling the camera that what you’ve just focused on is what you now want it to track — and it follows it everywhere around the frame for you.
The beauty of it is that when you let go of Fn1, you drop straight back to your Wide-area L box, exactly where you left it, ready to shoot as normal. You’re handing the focus from one AF mode to the next. One system, two buttons under your fingers and it works for sport, wildlife, weddings, events and portraits.
To recap: focus as normal with back button focus and your subject detection box. If your subject takes off, hold Fn1 and let 3D-tracking do the work. Release Fn1 and you’re back where you started. It’s my emergency turbo mode.
No matter how fast your subject moves focus handoff has your back.
Focus Tracking with Lock-On
This setting makes 3D-tracking noticeably better. It controls how quickly the camera gives up on your subject when something passes in front of it — another player running across the frame in front of a footballer, or a branch sweeping through as you follow a bird.
With the default setting, the camera can jump to the new object fairly quickly. Push the delay towards the longer end and it becomes far more stubborn about staying on your original subject when something briefly blocks it. For sport, wildlife and events, that’s the difference between tracking that holds through the chaos and tracking that wanders off at the worst possible moment.
Menu path: Menu → pencil icon → a Focus → a3 Focus Tracking with Lock-On → move the delay towards the longer end
Focus Peaking for Manual Focus
This one is for landscape, macro and product shooters, or anyone using vintage glass. When you focus manually, focus peaking highlights the in-focus edges with a coloured overlay, so instead of guessing you can see exactly what’s sharp in real time.
You can choose red, yellow, blue or white — I use red because it stands out against most scenes. You can also set the sensitivity: low highlights only the very sharpest areas, which is ideal for critical macro and product work.
Menu path: Menu → pencil icon → a Focus → a13 Focus Peaking → Focus Peaking Display → On
Final Thoughts on My Nikon Z8 Autofocus Settings
So there you have it — my complete, updated Nikon Z8 autofocus setup for 2026. It may not be perfect for you exactly as it is and that’s fine. Tweak it to make it truly yours. Once your muscle memory takes over, you’ll get incredibly consistent results and you can concentrate on the shot instead of the settings.
If you’d like to learn this hands-on, bring your camera along to one of my photography workshops in West Cork and I’ll set it up with you. And if you’re still deciding on a camera, my Nikon Z8 review covers three and a half years of pro use with it and my guide to the Z8 hot card warning is worth a read too.
Shoot a Z6III as well? Here’s my Nikon Z6III autofocus setup, which uses the same focus handoff technique.
Autofocus is just one part of the Z8. For my complete setup — every menu setting, custom button and fix, plus an ND calculator, sun and moon planner and troubleshooting section — get the Nikon Z8 Pro Guide app. It’s searchable, written in plain English with follow-along setting videos, available in over 100 languages and on iOS, Android and desktop with sync between them. On a Z9? Get the Z9 app.
Kieran Hayes
Kieran is a professional photographer, educator and Nikon Z reviewer based in West Cork, Ireland. Before turning professional in 2013 he spent years as a technician in an authorised service centre for a leading camera brand, so his hands-on knowledge of how cameras work goes back more than 20 years. Today he tests gear where it counts — on paid shoots, on his photography workshops and out on the Wild Atlantic Way — where reliability, performance and durability matter most.
His reviews reflect the practical demands of real working photography and the creative freedom of his own landscape work.